Official Manual · First-Time Setup

Shadowrocket Setup Guide

Start with the details you already have, then import, configure routing, connect, and verify in order. Check each result before moving on.

  • iPhone / iPad instructions
  • Your own subscription or server details
  • Five-step checklist

The steps below use the English labels shown in the app. Official screenshots help you identify each screen, but fields vary by selected Type and in-app settings. Don’t copy server details from screenshots or share subscription links or passwords publicly.

01 · Add Server / SubscribeImport the details you have and check that they were saved

After opening Shadowrocket, stay on Home and leave the connection switch off for now. Find Add Server in the SERVER section and open it. First identify the details you have: a subscription link retrieves a group of servers, while individual server details include the protocol, server address, port, and authentication parameters. These go in different places. Pasting a subscription link into the server’s Host field usually won’t create a usable entry.

Add a single server manually

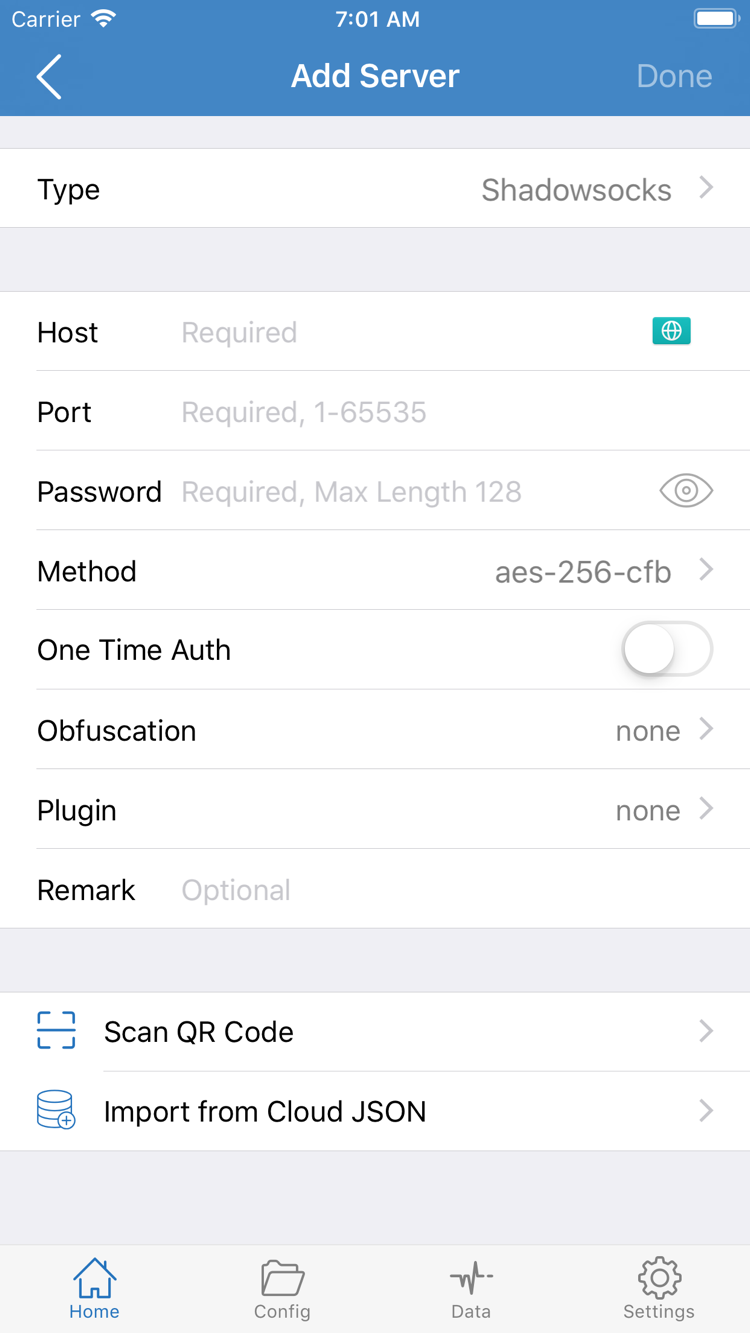
Open Add Server, tap Type, and choose the protocol that matches your details. Then fill in the fields required for that Type. For example, if the screen shows Host, Port, Password, and Method, enter the server address in Host and the port in Port, then match Password and Method to your original details. Each Type has different parameters; don’t reuse settings from another protocol just because the field names look similar. For TLS or other transport options, follow the server details you have.

Before saving, check for leading or trailing spaces, the port number, and capitalization in authentication details. Use the save option on the screen to return to Home. If you have a compatible QR code, tap Scan QR Code, allow camera access when prompted, and scan your own details. A QR code is just an input method; check that Type and all key parameters are present after scanning. Import from Cloud JSON is another option—use it only if you have details in the required format, not a regular webpage or arbitrary text.

Import an existing subscription with Subscribe

If you have a subscription link, select Subscribe under Type in Add Server, paste your complete link into the address field, add a note to help identify it, and save. Preserve the full path and query parameters when copying. Don’t include chat text, line breaks, or trailing punctuation. Subscription URLs can grant access, so protect them like passwords. This guide doesn’t display usable URLs or ask you to upload your subscription.

Return to Home after saving and wait for the subscription to load. Check that the expected group and server entries appear under SERVER. Seeing a subscription name with no entries doesn’t mean the import succeeded; check the result message, network connection, and URL. When the subscription changes, use its update action to fetch the latest details. Then check your selected server again so you don’t keep using an entry that has been removed.

After adding a server, don’t keep changing its parameters. Next, check Global Routing to see which requests will use this server once connected. This helps distinguish routing behavior from server availability.

Shadowrocket’s Add Server screen, showing Type, Host, Port, Password, Method, and import options at the bottom
Add Server: Choose Type first, then check the fields for that type.

02 · Global RoutingUnderstand the difference between Config, Proxy, and Direct

Return to Home, tap Global Routing, and choose Config, Proxy, or Direct for your current purpose. This controls how requests are routed; it doesn’t fill in server parameters or replace the server itself. For your first setup, understand what each mode does before choosing one for regular use. Don’t cycle through every option just because a particular website won’t open.

Config: Route traffic using the active configuration

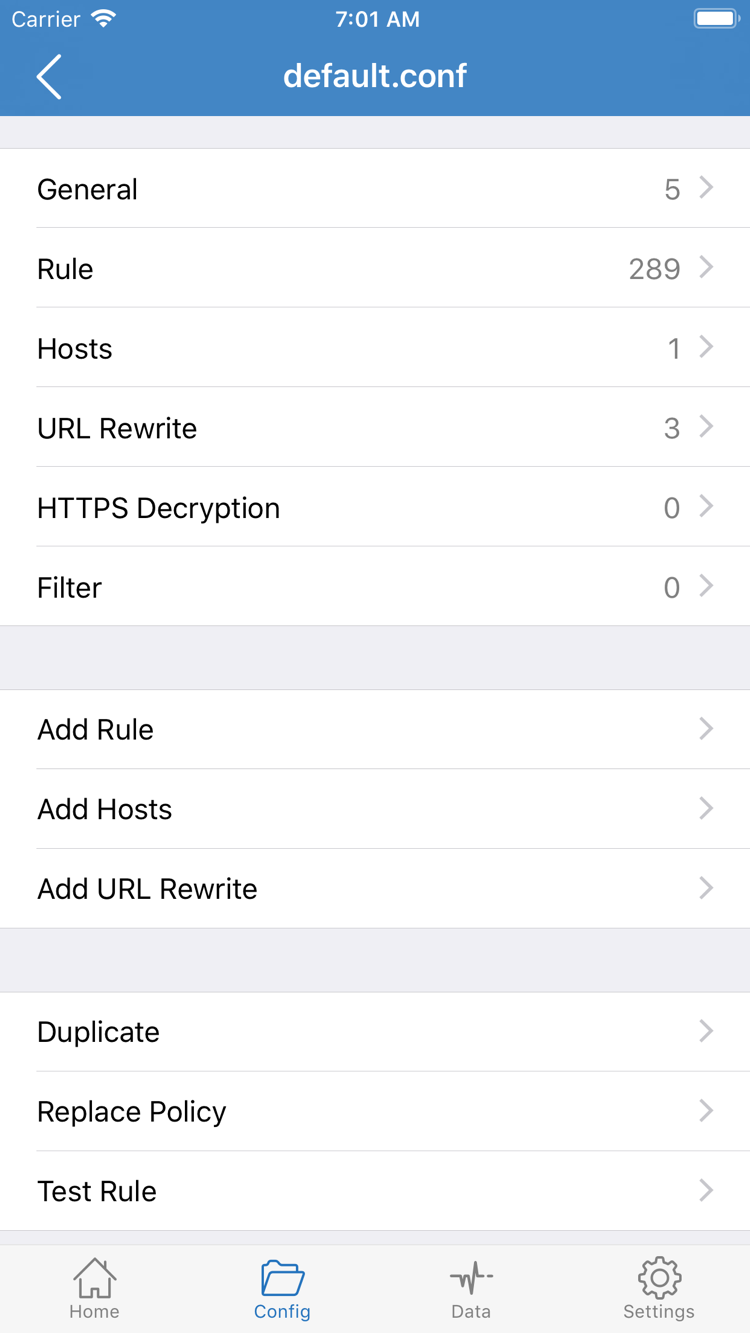
Config handles requests according to the rules in the active configuration. Open Config and confirm that the configuration you intend to use is enabled—not just open in the editor. In the configuration editor, General, Rule, Hosts, URL Rewrite, and HTTPS Decryption serve different purposes. You don’t need to change them all for your first connection. Focus on the configuration source, its enabled status, and the Rule entries relevant to your destination.

Rules are generally checked from top to bottom, and the first matching rule determines how a request is handled. DOMAIN matches a full domain, DOMAIN-SUFFIX matches a domain suffix, IP-CIDR matches an address range, and FINAL acts as a catch-all. PROXY, DIRECT, and REJECT are different policies; REJECT does not mean “try another server.” The example below shows rule syntax only—it isn’t a complete configuration to replace your current one with.

[Rule]
DOMAIN,api.example.com,DIRECT
DOMAIN-SUFFIX,example.com,PROXY
FINAL,DIRECT

In this example, api.example.com matches the first line and uses DIRECT. Other matching domains with that suffix are handled by the second line. If a broad rule comes before a more specific one, later entries may never match. Keep a copy of your original configuration before making changes, edit only a rule you understand, and confirm that the configuration is enabled. Add Rule in the screenshot adds a rule, not a server.

Proxy and Direct: Compare the two routes separately

Proxy sends requests through the proxy route and can help you check the selected server’s connection. It doesn’t guarantee that every remote destination is reachable. Direct uses the local, non-proxied route and can help confirm that the basic network works, but opening a website in Direct doesn’t prove the proxy route is working. You can switch modes briefly while troubleshooting, then return to the mode you originally intended to use.

For rule-based routing, use Config and check the relevant rules. To separate server issues from rule issues, make a brief comparison using another mode. For beginners, keeping the existing configuration structure is easier to troubleshoot than changing Hosts, URL Rewrite, and HTTPS Decryption at the same time. Before connecting, note the current mode and active configuration name.

For more on rule keywords, see the rule syntax guide. Store regions, purchases, and restoring purchases are covered separately in the App Store guide; you don’t need to handle those during your first connection.

Shadowrocket’s Config editor, showing General, Rule, Hosts, URL Rewrite, HTTPS Decryption, and Add Rule
Config: Check Rule and the active configuration; you don’t need to edit every section at once.

03 · Connect from HomeGrant system permission and check the connection status

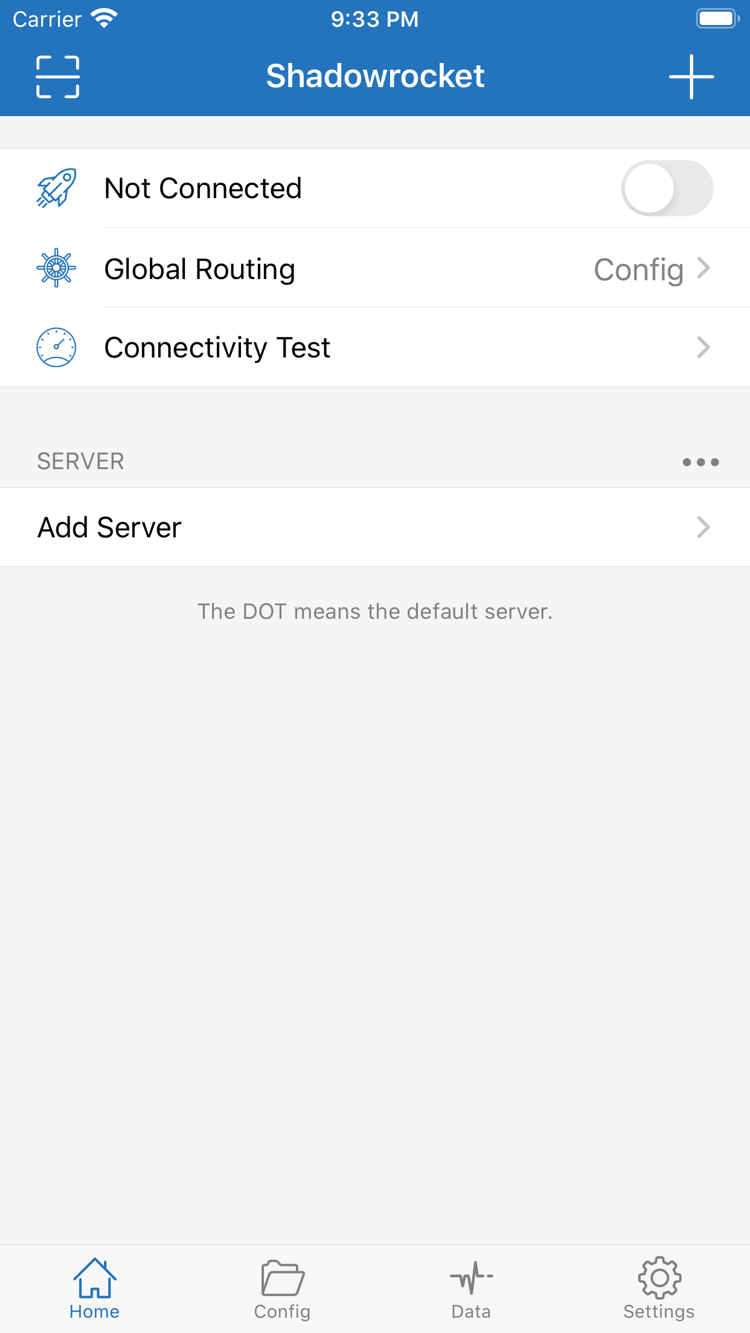
Return to Home and check three things: the server you intend to use is selected under SERVER, Global Routing matches your choice in the previous step, and the device itself has an internet connection. If the top of the screen says Not Connected, the connection hasn’t been established. Turn on the switch at the top and watch for system prompts and changes in the app. Don’t toggle it repeatedly or update the subscription while it’s connecting.

Understand the system request to add a VPN configuration

The first time you turn on the connection, the system may ask to add a VPN configuration. This lets Shadowrocket create a system-managed network configuration; it isn’t a purchase prompt or a field for entering server details. Read the app name and message, then confirm as instructed. The system may also ask you to authenticate on your device. When finished, return to Shadowrocket and check whether the status at the top has changed from Not Connected.

If you previously denied permission, the connection may not be able to start. Turn on the connection switch again and follow the prompt. Don’t delete unrelated system configurations to bypass it. If the device is managed by an organization, its policies may restrict this action; confirm that it’s allowed. Permission only allows configuration on this device—it won’t fix an incorrect Host, Port, or authentication parameter.

Check connection status separately from actual access

A VPN status in the system or an enabled app switch means the local connection state has changed, but doesn’t prove that the selected server and every destination are working. If the switch turns off again immediately or the status never appears, check the message first. Then confirm that permission was granted, the server is still selected, and the configuration is valid. Note the exact status text; it’s more useful for troubleshooting than simply saying “it won’t connect.”

For your first connection, keep the test conditions consistent: use the same network, server, and routing mode. If you need to switch between Wi-Fi and cellular, stop the current test first, then reconnect on the new network and check the results. Changing several variables at once makes one-off successes hard to reproduce and can hide the actual problem.

Shadowrocket’s Home screen, showing Not Connected, Global Routing, and Connectivity Test at the top, with SERVER and Add Server below
Home: Check the connection switch, routing mode, and selected server here.

04 · Connectivity TestTest the server first, then check real requests

After connecting, return to Home and use Connectivity Test to check the current server. Before starting, confirm that the test is for the server you actually selected. Wait for it to finish before comparing results. The test reflects its chosen method and the network conditions at that time; it doesn’t show that every app or destination is working. Don’t treat a single test result as a measure of long-term performance or infer real-world access from the order of servers in the list.

Record test results separately from access results

First open a page that you can usually access directly on your current network to confirm that the device’s basic connection works. Then visit the destination you actually need to check and see whether it loads. If the test succeeds but the destination fails, check routing rules, the destination itself, and relevant connection records instead of immediately deleting every server. If the test fails but some pages still open, those requests may be using DIRECT, or the test method may use a different route from real requests.

In Config mode, interpret results in light of the active rules. If a destination matches DIRECT, a successful page load doesn’t test the proxy server. If it matches REJECT, the failure may be expected. In the app’s connection records, check the destination domain, matching rule, and applied policy. If the records don’t provide enough information, leave the result as uncertain rather than inferring the route for all traffic from one page load.

Narrow it down with one comparison

If you suspect a rule issue, note the original settings, temporarily switch to Proxy, and revisit the same destination using the same server. If the result changes, check which rule matched in Config. If it doesn’t, check the server parameters and current network. You can briefly use Direct to check the local network, but that’s only a diagnostic step—not evidence that the proxy connection works.

When you’re done comparing, restore the original Global Routing mode so you don’t mistake a troubleshooting setting for your regular setup. At minimum, record the current network, server note, routing mode, Connectivity Test status, and destination access result. Use a label that makes sense to you; you don’t need to share the server address. If these checks don’t explain the issue, follow the troubleshooting steps below in order.

Check in this order: Device is online → details are imported → selected server passes its test → connection status is clear → destination uses the expected policy → actual access matches expectations.

If you haven’t confirmed one step, resolve it before moving on. Don’t use a later one-off success as a substitute for checking the earlier steps.
05 · Settings and TroubleshootingChange one thing at a time and keep results reproducible

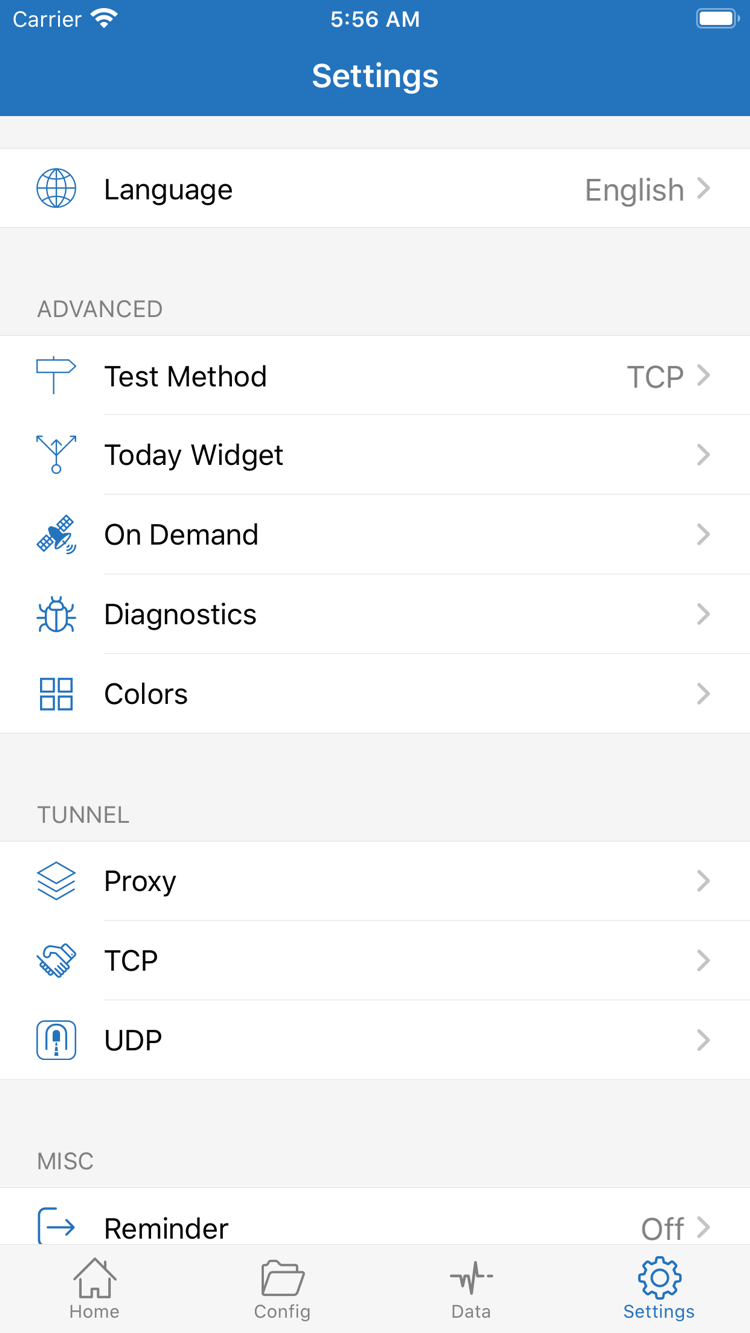
If something goes wrong, stop rebuilding the configuration and check in this order: local network → imported details → server parameters → system time → rules and test settings. Test Method, On Demand, Diagnostics, Proxy, TCP, and UDP in Settings relate to different areas; don’t enable or disable them all at once. First identify whether the failure occurs during import, connection, or actual access, then choose the relevant checks.

No servers appear after import, or an update fails

First confirm that the device can access the internet. Then check that the subscription URL is complete, contains no extra spaces, and still has access permission. Changing Global Routing repeatedly usually won’t fix a URL that can’t be read. Check the update result and message; if needed, ask the provider of your existing service to confirm the link status. After obtaining valid details, update the corresponding Subscribe entry and confirm that server entries appear—not just the group name.

Test times out, or destinations won’t open after connecting

Check Type, Host, Port, and the authentication fields for that protocol. Look especially for missing characters, capitalization changes, or an incorrect port from manual entry. For connections using TLS, also check the relevant names and options in your existing details, and make sure the device’s date, time, and time zone are correct; an incorrect time can affect certificate validation. Follow the details you have. Don’t disable validation or switch protocols at random.

Next, open Settings and check Test Method, then return to Home and retry under the same conditions. A failed test only means that the test didn’t produce the expected result; consider it alongside actual access. If the issue occurs only in Config, check the active configuration, rule order, and final policy. If the same server behaves differently on different networks, note the network differences and narrow down the cause one step at a time.

The switch changes automatically, or only some apps have problems

First check whether On Demand is enabled and whether its trigger conditions match what you expect. It serves a different purpose from the manual switch. During initial troubleshooting, avoid letting automatic triggers affect comparisons, but don’t clear existing settings in bulk if you don’t understand what they do. For issues affecting only some apps, distinguish between domain matching, DNS resolution, and TCP or UDP routing. Don’t change every option just because it appears in Settings.

If you need to investigate further, use the diagnostic tools actually available in Diagnostics and note what you did and the message shown when the error occurred. Before sharing records, remove subscription links, passwords, authentication identifiers, and other sensitive details. Keep only the status, field names, and steps needed to explain the issue. A complete subscription URL isn’t necessary for troubleshooting.

After correcting one item, verify the setup again in the order used on this page: return to Add Server / Subscribe and check your details, confirm Global Routing, then connect and run a Connectivity Test and real-world access check. Save the working result before changing anything else. For server timeouts, see the connection timeout troubleshooting checklist.

Shadowrocket’s Settings screen, showing Language, Test Method, Today Widget, On Demand, Diagnostics, Proxy, TCP, and UDP
Settings: Check the relevant item for the issue; don’t change settings in bulk.